My pansies are happy where I planted them. Even the deadheaded blossoms that I toss into the birdbath appear pleased.
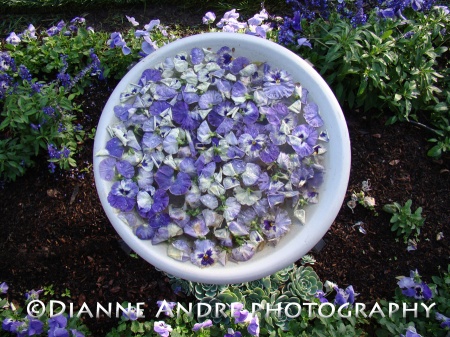


My pansies are happy where I planted them. Even the deadheaded blossoms that I toss into the birdbath appear pleased.
My first excursion with the Sierra Light Photography Meetup was…well…venturesome. To recap from the last newsletter issue, this is a new Meetup Group for “anyone who has a desire to learn more about their camera and search for beautiful landscape images to capture with like-minded photographers of all levels.”
Five of us carpooled from Jackson. I sat in the front passenger seat to minimize car sickness. Halfway to Winnemucca Lake, the driver ahead of us pulled into the slow lane and then sped up when we passed. Our driver wanted a little victory and met the challenge. Watching the car beside me, the tires traveled so fast each seemed to spin the wrong way. I’m guessing 90 – 100 mph.
The moment I said a silent prayer, our driver backed off.
Then, in the middle of town, he floored the accelerator, crossed the double line, and leaned around me to send a dirty look toward the other driver.
Fortunately, he didn’t pursue us.
Eight more photographers joined us at the Winnemucca parking lot; friendly folks with classy lenses and tripods. My little point-and-shoot camera looked like a plastic toy. We left on foot for the lake, for that perfect landscape, and instructional tips from our leader.

Four miles in, I never saw them again.
I stayed behind with two others whose knees couldn’t endure further hiking. Excuse welcomed. My lungs couldn’t handle the altitude. So we headed back. There were plenty of August wildflowers and green vegetation on the trail. But most were off the path, across the creek, or along a steep hillside, too far to capture with my restricted lens.
I did manage to maneuver behind a redwood where a huge mushroom grew beneath a beautiful red flower that I have not been able to identify.


Alongside the rocky trail were Fireweed (left) and Aster.


The gentleman who stayed behind shared his lunch, and before giving me a ride back to my car in Jackson, I left a note on the other driver’s windshield.
Will I go to another Sierra Light Photography Meetup?
Yes. In my own car.
At my own pace.
Will I have a pro camera and lens?
Sigh.

A lot happened after the last post from guest writer Heidi Gaul. Those challenging times are over, I hope. Since I am practicing “no complaining” I’ll share the upside of gardening during the past weeks.
When I visited a dear friend in Shenandoah Valley, I took three photographs. Usually, when I’m in a beautiful garden, like my friend’s, I can’t stop taking pictures. But we don’t see each other often and she is such a lovely person, that I wanted to spend the short visit with her.


During the past weeks, I managed to stop in at the local garden center, twice, at Lowes. The first time, I didn’t buy anything, but found their large selection of succulents impressive.


The second time at Lowes, I bought a flat of annual vinca.


The flowerbed is small, and has a split personality. Plants love the north half of the bed, but not the south half. Even though I amended the soil, studied the water intake and sun exposure, I lost six or eight vincas. Those remaining are much smaller than the ones in the photo, planted on the north half. I can’t figure out the problem. But I know from past experiences, I’ll find plants that will thrive throughout the flowerbed.
Everything works out, eventually, even in the garden.

By Heidi Gaul
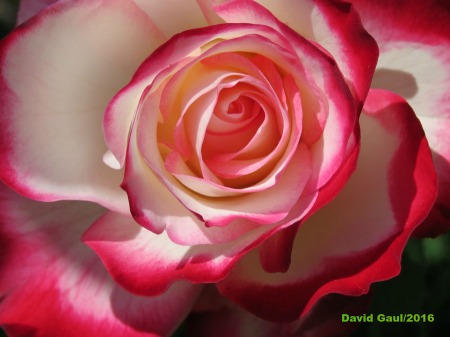
I love roses, any kind of rose, be it an Old Word variety, a creeper, a climber, a tea rose or a floribunda. But my devotion to these beautiful blooms doesn’t mean they all return the affection. Miniature roses and tree roses are a mystery I haven’t yet been able to solve. I am convinced they begin their death march during the drive home from the nursery.
Give me a hardy showstopper like Jackson & Perkins’ Cherry Parfait Grandiflora,

or Weeks’ About Face Grandiflora, and I’m fine.

Jackson & Perkins’ Julia Child (known as the Absolutely Fabulous in the U.K.) is another sturdy, gorgeous favorite of mine. This floribunda delivers “bouquets” in the prettiest shade of yellow, and though the fragrance is delicate, it is divine.
In the Northwest where I live, one of my biggest challenges is black spot and I fight it diligently with powder and systemics. I’m curious—what is your favorite rose and why? What threats to your roses do you battle?
Heidi Gaul is an avid gardener, writer, and winner of the Cascade Award 2015- Devotionals. http://www.heidigaul.com/
Photography by David Gaul.
Awakened by a noise, the sleeping dog jolted. He sat erect and stiff with a low growl in his throat. His head jerked to the right. Something in the shadows had moved. The dog lunged across the grasses and ran into the jungle like the wolfdog in his dreams.

He followed an unfamiliar scent and treaded around the bottlebrush, rustling the foliage. Delicate red spikes dropped, sticking to his fur. A hummingbird dived in for nectar. The dog growled at the intrusion and tuned away.

He sniffed along a path between Santa Barbara Daisies

and whimsical Love-in-a-Mist.

The dog, still a wolfdog in his mind, confidently moved alongside the butterfly bushes, purple clusters dangling over hydrangea blooms.

Bored, he settled among the shadows and guarded the jungle entrance, satisfied his courage and colossal statue had banished the unseen intruder.
Butterfly Bush (Buddleia spp.): full sun; zones 5-10, spring bloomer, attracts butterflies
Dwarf Callistemon (bottlebrush): full sun, zones 8-9, 12-24, spring bloomer, draught tolerate
Santa Barbara Daisy (Erigeron karvinskianus): full sun/light shade, zone vary by species, annual, blooms spring – fall
Love-in-a-Mist (Nigella damascene): sun-partial shade, all zones, annual, blooms late spring/early summer, reseeds
Hydrangea: full sun on coast, partial shade inland, zone vary by species, late spring/late summer/early fall
One of the best blogging days is when I get to wish all the wonderful Moms around the world
a
Happy Mother’s Day.


Touring gardens is a great way to discover what you don’t like and what you want to implement in your own yard. Here’s a garden that I recently visited.


Twilight Zone Grandiflora


Chicago Peace Hybrid Tea


Rain was expected through Friday evening, and since I didn’t have the proper material I placed a patio furniture cover over my peony plant. There were over a dozen buds and three blossoms. Too much downpour can cause developing buds to wilt and die, which happened last year.
Peonies are my favorite flower. Waiting and watching the tiny buds mature into stunning saucer-size ruffles is like anticipating a beautiful flower delivery. But keeping my peony under cover too long was a concern. Plants need light and sun, and circulation.
Saturday, it rained all day and into the night. I stood on the front porch and listened to droplets settle on black plastic, concrete, and surrounding plant life. It was a welcome sound in California where the drought is grim. Everything was wet. Water ran from the downspouts. Cottontails, robins, blue jays and doves were tucked out of sight like my peony.
I decided I would uncover the plant on Sunday, even if it was raining. In the morning, I looked outside into the early faint light. The earth was soaked, but the sky had stopped crying.
Gently, I lifted the black plastic and squealed for Iron Man, who was nearby, to come quickly.

Many of the buds had bloomed beneath the warm cozy cover. Layers of bright white ruffles looked up at us unharmed.

It was one of those moments when you’re a young girl again and the doorbell rings. You answer and no one’s there, but below is a beautiful bouquet of flowers addressed to you. Just for you.

If you haven’t had the urge yet to mosey through your local nurseries, the fever should hit you any day now. Where I live, frost is still a possibility so I am looking only at color spots. Here are five beauties that stood out above the other blooms at OSH and Green Acres.

Above and below
Ranunculus: tubers or perennials; all zones; full sun;
1.5 feet tall
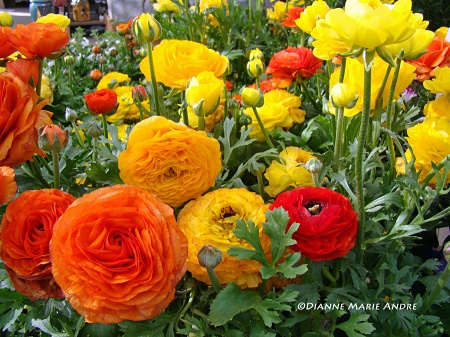

Nemesia: perennials and annuals; zones vary by species;
full sun

Gerbera Daisies: annual and perennial; zones 10-11;
6-12 inches tall; full sun; part shade in hottest areas

Dahlia Hypnotica Orange: tuberous-rooted perennials;
all zones; full-part sun; 15-19 inches tall
All of the above are suitable for growing in containers.
Do you have a favorite?


