h1

Watermelon Uses

August 30, 2012

Image

I didn’t plant a vegetable garden this year because the nearby trees have squeezed out the sun’s rays. Vegetable plants need at least six hours of full sunlight. It is not an easy decision to leave raised beds bare. So much work went into the boxed construction, soil prep, and waterline installation.

However, a couple of volunteer watermelon vines popped up in the westerly edge of one bed. Here the foliage captured enough sun for photosynthesis. Excited about the prospect, I watered the vines with great expectations. I weeded the soil with care. I watched with eagle eyes for voles. Then come harvest, I ate a feast of round, pink pulp so sweet it was like kissing pure sugar. Delicious!

But watermelons are not limited to mouth-watering bites fresh off the vine. There are many uses for this juicy treat, some of which include watermelon:

  • Seed tea to cleanse your kidneys
  • Roasted and salted seeds
  • Seed spiting contests
  • Mosaic seed art
  • Anti-aging rind
  • Smoothies
  • Alcoholic beverages
  • Soda
  • Punch
  • Pureed soup
  • Jelly
  • Frozen fruit pops
  • Pickled rinds
  • Ice cubes
  • Hollowed-out canteens or salad bowls
  • Centerpieces
  • Carvings
  • Face pack for soft, supple skin or for sunburns and suntans
  • Grated watermelon facial scrub

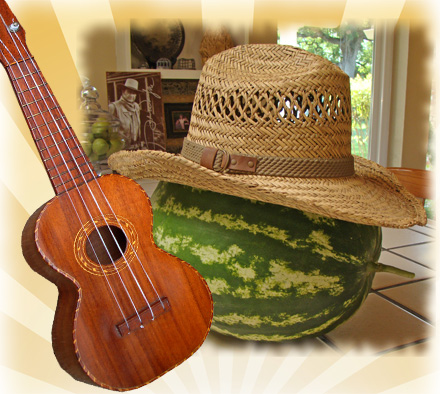
If you can believe it, there are even more uses for watermelons. But only a cowboy would utilize a watermelon for a hat rack!

What did you do with your watermelons this year besides eat them?

Have a fun, safe Labor Day weekend!

Posted from the library!

h1

I’m still here, gardening, getting my hands dirty!

August 14, 2012

Image

Dear Friends:

I’m typing from one of the library’s computer stations. Since I am able to get into my blog from here, the problem appears to be, in-part, my eight-year-old home computer.

I’m sorry for taking so long to figure this out and to let you know, but life has been one heck-of-a-ride the past four months. I see that everyone has remained subscribed and I thank you for understanding. There’s lots of material to review at inandaroundthegarden.net so please use it, and send your friends this way.

I may have to rob a bank, but I will be back when I can get the problem resolved!

I hope your summer has been rewarding and fun.

I pray your dreams are evolving,

And your life is abundant. –Dianne

h1

Six Steps to Healthy Plants

April 12, 2012

Dear Friends:  Just as it had happened a couple of weeks ago, my computer, browser, dial-up connection, or ALL THREE has been as slow as a slug crossing the garden path—thus no posting until this evening. I had logged in many times off and on since Monday, then waited an hour or so hoping the posting page (where I upload the articles and photos to publish) would open, but no luck. While I apologize, I also ask that you understand this could happen again. Lately, it seems to happen more often. If I had tech skills, the slug (or slugs) causing all the problems would never make it across the path. Instead, it would see the bottom of my old garden shoe.

Whether you’re a novice, passionate or occasional gardener, by following a few steps you can keep your plants looking their best. These simple effective steps introduce you to the basics of healthy plants that will reward you for years to come.

  1. Zone:  Select plants for your zone by buying from local nurseries. Utilize the knowledge of nursery persons, neighbors, garden club members, cooperative extension agents, and master gardeners.
  2. Size:  Minimize pruning by placing plants and trees where they have ample growing space for maturity, away from buildings and overhead utility lines. Avoid overcrowding plants so they don’t have to fight for nutrients.
  3. Exposure:  Sufficient light is one of the most important elements to plant growth. Improper light duration and magnitude can stunt growth, burn foliage, or even kill plants and trees.
  4. Temperature:  Select plants that will survive in your areas lowest winter temperatures. Most plant tags provide cold/heat zone data listing minimum hardiness and heat tolerance temperatures.
  5. Water:  It’s no secret plants can’t live without moisture. When and how much water a plant needs will vary according to the variety and soil type. Don’t put water-loving plants and trees in an area with little water or drought resistant plants in soil with poor drainage. Follow a regular water schedule using timers wherever possible.
  6. Nutrition: Nutrients is crucial to plant health. Your soil’s texture and fertility will determine how much and what you need to add for moisture retention, proper drainage, or organic material. A simple soil test kit (available at most nurseries) will provide data on your soil’s composition. The three main ingredients plants need are: Nitrogen (N) promotes vigorous leaf growth. Phosphorus (P) encourages good development of roots, flowers, and fruit. Potassium (K) promotes cell division and strong stems.

Follow the above tips and your plants will give you satisfying results year after year.

h1

Spring Awakening: An Easter Poem

April 8, 2012

MyFreeCopyright.com Registered & Protected

The hens lay their eggs again; I gather a daily yield

The grass grows tall; the pastures emerge green

I mow more often the lawn and fields.

Alone I garden, in deep regard this spring

For passionate labor and good things received

Including the sacrifice of Jesus, His abundant love

Come spring, come Easter, come every day

A solace to the human race.

Copyright © 2012 Dianne Marie Andre

Happy Easter family and friends.

h1

Garden Tips Hints and Cool Things

April 6, 2012

Tips:

1)   Lavender plants:  After new foliage has grown in, cut back by 1/3 to stimulate new growth at base of the plant. Never prune out old wood unless it is dead. For more April tasks, click here.

2)   Now is the time to fertilize all your plants and trees. They are working hard to produce new growth and blossoms so give them what they need to be strong and vibrant. Make it simple, buy one fertilize. Organic manure can be used on any type of plant and tree.

3)  This tip is from blog reader, Georgia O. Although the tip doesn’t have anything to do with gardening, I thought it was important enough to share:  Place the contents of your wallet on photocopy machine. Make a copy, copying both sides of each license, credit card, etc. Keep the photocopy in a safe place. You will know what you had in your wallet and all the account numbers and phone numbers to call and cancel.

A Cool Thing:

1) Check out your garden smarts and learn as you play online trivia games from dozens of garden topics.

2) FREE for the taking:  1) Large Eucalyptus trees, could be 40 plus feet tall–some maybe 2 ft. in diameter. Must know how to fall trees and clean up after cutting down the trees. Makes great firewood or whatever need you might have; 2) Peeler posts if you want wood for borders, decorative staggered heights fencing or firewood. Probably 75 of them and at least 4 or 5 feet is usable. Email me at inthegarden@softcom.net


h1

The Basics: Repotting into a Larger Container

April 4, 2012

Supplies:  Existing potted plant, larger container, potting mix, broken potsherds or packing peanuts, trowel, blunt knife or hand weeder, snips, water

1.  Select a new or repurposed container one – two sizes larger than the existing one.

2.  Tilt the container and carefully pull the plant out of the pot by grasping the trunk just above the top soil. If the plant doesn’t move, slide a blunt knife down the sides to loosen the roots and try again. When necessary, as seen in photo to the left, break the pot by likely tapping it with a hammer. Be sure to wear protective glasses. Slice plastic containers open with a knife.

Tip:  Repot when the plant’s soil is on the dry side (slightly moist). The plant will be lighter and easier to lift out of its container. Never repot saturated plants, as the roots will separate from the soil.

3.  Carefully loosen the roots with a blunt knife or hand weeder. Trim off broken roots and cut back extra long roots by a third.

4.  Cover the drainage hole with broken potsherds or packing peanuts.

Tip:  1) If reusing an old container, scrub the inside with detergent or four parts water to one-part bleach to kill harmful organisms. Rinse well. 2) If your container doesn’t have a hole, drill one hole in small to medium containers and two holes for very large pots.

5.  Place fresh potting mix about a third up in the new container. Check the height by gently positioning the plant on the mix. The crown of the plant should be one to two inches below the top of the pot. This will allow space for watering and eliminate overflow.

Tip:  To absorb excess water and gradually release moisture to the roots use moisture control potting mix.

6.  Once you have established the proper height, center the plant spreading out the roots.

7.  Add fresh potting mix around the sides, gently working it down with a trowel or hand weeder making sure there are no air pockets. If your container is tall, use a thin stick or heavy-duty non-bendable wire. Be careful not to compact the mix.

8.  Set container on risers and water well. Keep out of hot summer sun for at least a week until the plant(s) can recoup from transplant shock.

h1

April 2012 Events

April 2, 2012

You gotta love April.

Frost dates are nearly past,

the soil is warming up,

nurseries overflow with plants,

and every possible garden-related opportunity is at our fingertips,

from mushroom seminars to afternoon tea.

Take advantage of the April activities now posted

under ‘Events’ on the sidebar.

Many of the events are FREE!

You gotta love FREE!

h1

Soil Analysis: From a Bird’s Eye View

March 26, 2012

While my husband kept his eyes on the road during a Sunday Drive, I took these photos through the windshield

Amazing what the soil, and nature, can produce without our help.

h1

Garden Tips Hints and Cool Things

March 23, 2012

1) If you are getting ready to sow wildflower seeds, use an empty Parmesan cheese shaker. Fill with a mixture of fine sand and seeds. Then simply shake to spread the seeds as you are planting. The seeds will distribute more evenly. This will also save time.

2) Slugs and snails are coming out. Handpick or place empty 10 to 14oz cans in the ground with the rim at ground level. Fill with beer. The slugs and snails will crawl in for a delicious drink but they won’t get out.

3) Humming birds have arrived, so clean feeders and fill with sugar-water:  One part sugar to four parts water, boiled until dissolved, and completely cooled.

If you have garden tips, hints, or something cool or interesting to share, email them to inthegarden@softcom.net and I will post them along with your name.

Happy Friday!

h1

Springtime is Mint Time

March 21, 2012

MyFreeCopyright.com Registered & Protected

By Guest Writer Bernadine Chapman-Cruz

Mint – a plant that reigns supreme when it comes to a potent freshness that adds a fragrant aroma to your garden as well as your table. This hearty herb is diverse in culinary and curative properties ranging from the Middle East and Asian countries to Northern Europe and the Americas.

But gardeners beware. The quickly growing carpeting ground cover is considered invasive, choking out other garden plants and herbs in close proximity when planted in a flowerbed. For best results, plant mint in a separate area away from other herbs or in a container pot with saucer, so roots will not grow through the drainage hole and take hold in the soil underneath. It is best to keep mint plantings away from other herbs, as the strong mint scent can overtake milder herbs mingling aromas.

Mint flavor is cool, refreshing and aromatic. Plant either root cuttings or seeds in late spring. Choose a rich soil, in a cool, damp, moist location. Mint also tolerates full sun, but generous watering is required. Mulch to protect plants against frost. Garden mint grows profusely from underground runners, requiring cutting back when blooms appear. Thin mint frequently to discourage overgrowth. Harvest small tender leaves at soil level for strongest mint flavor.

In the realm of culinary delights, mint enhances beverages like Mint Julep and hot or iced teas. Mint flavored jellies and syrups are also popular. Many recipes call for mint as seasoning for lamb, pork, peas, potatoes and even desserts including mint flavored ice cream.

The herb is also known for its medicinal properties. For centuries mint has been linked to curatives for stomach ailments, insomnia, headaches and used as a natural diuretic. Beauty regimens including mint have been traced back to Ancient Egypt and the herb is also used as an antiseptic. Mint can also be used to freshen breath and clean teeth.

Mint is an aggressive natural insecticide in the garden, warding off mosquitoes, wasps, hornets, cockroaches and ants.

Springtime is mint time. Enjoy this pungent herb fresh from your garden.

Copyright 2012 Bernadine Chapman-Cruz